While working in Excel, you may need to select multiple cells, click on your first cell and drag over the other cells that you want to select. Or you can hold the shift key and move the cursor to make the selection. That’s probably the most common way of selecting multiple contiguous cells in Excel.
Occasionally, we may wish to select cells or columns that are not next to each other (non-adjacent).
In this guide, you can learn how to select non-adjacent cells in Excel.
Using the mouse and keyboard to select non-adjacent cells
Using the mouse to select non-adjacent cells is the most useful way (along with the keyboard).
The steps for selecting non-adjacent cells are as follows:
1. Click the first cell you want to be selected and become it will active cell.
2. Hold the left mouse button and drag them to cover all the cells that you want to make the first selection.
3. Release the mouse click, after finished the selection.
4. Hold down the Ctrl key on your keyboard and drag over other cells to make the next selection.
5. Once you release the Ctrl key, don’t click anywhere else with the mouse cursor.
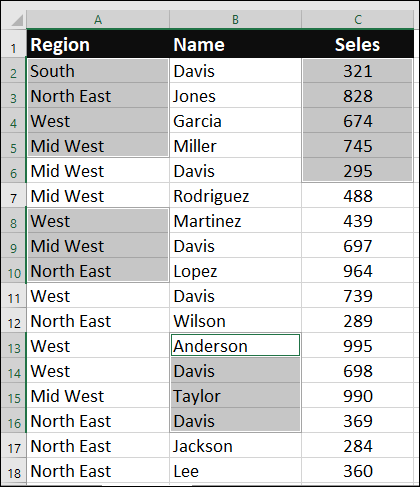
Again, if you want to select more additional cells, repeat the above steps 3 and 4.
Using the keyboard only to select non-adjacent cells
The easiest and the best way is using the keyboard and mouse (above method) to select non-adjacent cells.
But if you prefer to work in Excel with the keyboard, there’s also a way to select non-adjacent cells by using the Extended Selection mode.
Follow the below steps to select non-adjacent cells in Excel using only the keyboard.
1. Move the cursor to the first cell you want to select and press F8 to enable Extended Selection mode, which also selects the first cell. In the Excel screen’s bottom-left corner, you can see the status bar.
2. Use the arrow keys on the keyboard to select all the adjacent cells that you want to select.
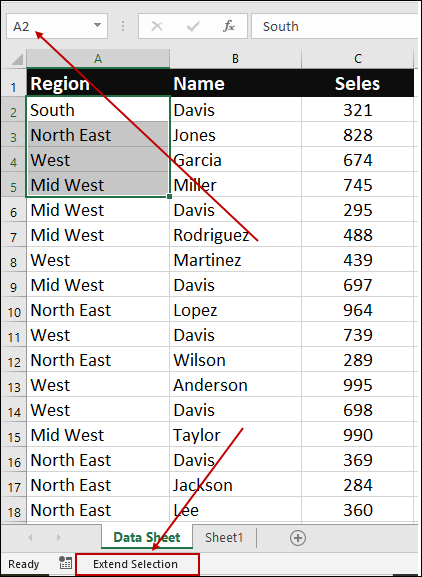
3. Remove the Extended Selection mode, press Shift+F8 keys on the keyboard, and it will change to Add or Remove Selection.

4. Use the arrow keys to move the cursor to the next cell you want to second selection.
5. Again, press the F8 key and move the cursor with arrow keys on the keyboard to make the selection.

Once again, to make another selection, repeat the above steps 3, 4, and 5.
Using the Name Box to select non-adjacent cells
You may sometimes need to select particular cells that are dispersed in your worksheet. In this situation, you can also use Excel’s Name Box to select non-adjacent cells.
The Name box is situated to the left of the formula bar and is always visible, which normally displays the address of the worksheet’s active cell or group of cells. Type the cell reference in the Name Box and press Enter key to select particular non-adjacent cells.
The steps below to select non-adjacent cells using the Excel’s Name Box are as follows:
1. Click the Name Box and,
2. Type the specific cell reference in the Name Box that you want to be selected, separated by a comma(,). (A2:A3,B8:B10,C2:C6,A11:A16) for our example)
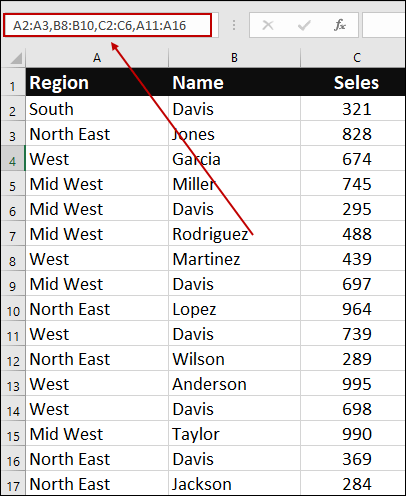
3. Then, press Enter key.
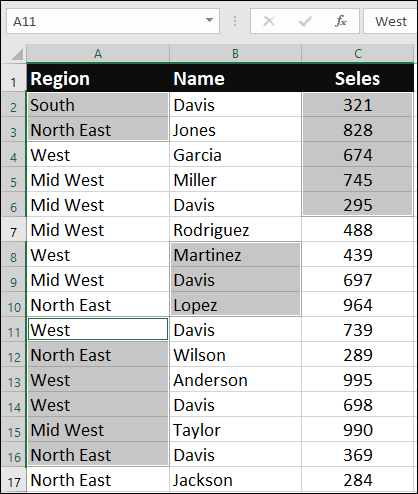
And all the specified cells will be selected instantly. The last specified cell becomes the active cell while using the Name Box.
Using Find and Replace tool to select non-adjacent cells
Sometimes, you may need to select cells (non-adjacent) based on a specific value.
Suppose you have multiple sales reports datasets and you want to select all the cells that have the name ‘Davis’.
The steps to use the Excel’s Find and Replace tool to select non-adjacent cells are as follows:
1. Select the range of data where you want to select all cells based on a specific value.
2. Press the Ctrl+F or select Find under the Home > Find & Select. A Find & Select dialog box will appear.
3. In the Find and Replace dialog, type the name ‘Davis’ (that you want to select) in the Find what field.
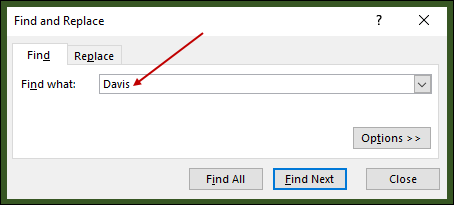
4. Then, click the Find All button.
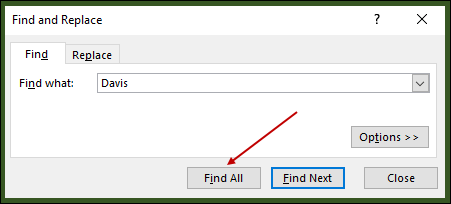
5. The Find and Replace dialog will find all the cells that match the name ‘Walmart’. Now select all the cells that were found by simply pressing Ctrl+A.
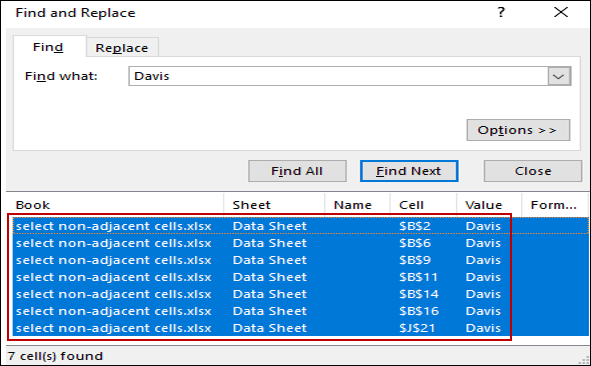
6. Then, close the Find and Replace dialog box by clicking the Close button.
All the cells that contain that specific word are now selected.
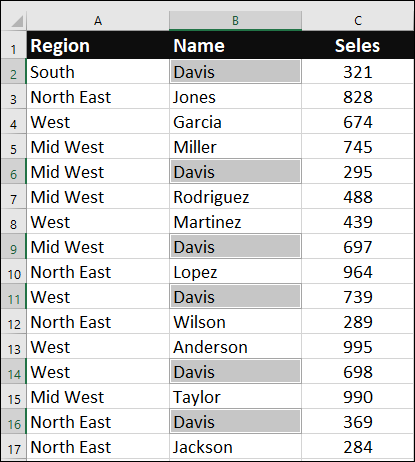
At this time you can change, edit, or format these select all cells.
First, select all the Mike name cells using the above steps that you want to change the name Davis to Harris. Once selected, start typing the name Harris into any of the selected cells.
After entering the value, press the Ctrl + Enter key. All the selected cells will change into the next entering (Davis to Harris) data.
You can use this method to enter text, numbers, values, and formulas.
Select non-adjacent cells or columns using Go To
Another way is to select specific cells that are scattered and far away. At this time you can use the ‘Go To‘ feature in Excel to select non-adjacent cells.
1. Select the entered data range.
2. Click the Find & Select option under the Home tab and select Go To feature or press the F5 function key or you can use the keyboard shortcut Ctrl+G.
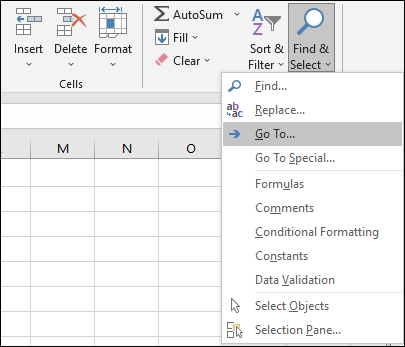
3. In the Go To dialog box that opens, enter the references cells number (that you want to select) in the Reference field. Separated by a comma(,). (A1:A20,C1:C20,F1:F20 for our example).
4. Then, press the OK or Enter key.
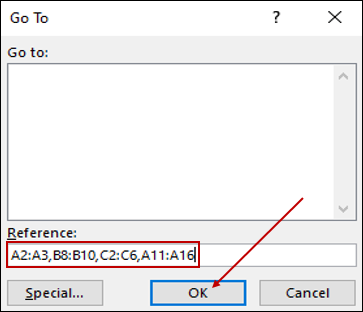
This would select the specified cells.

How to select Non-Adjacent cells in Google Sheets
For single cell
Click the first cell that you want to select and click another cell by holding the Control key on your keyboard.
For multiple cells
Click the first cell and drag to cover all the cells by holding the left mouse button that you want to make your first selection. Release the mouse click. Hold the Control key and drag over other cells to make the next selection.


thank you so much sir this is very good artcile