How do you use Excel? We want to show you a quick Excel guide in this article on how to use Excel for beginners.
We especially appeal to anyone who has never used Excel before and wants to know the first steps on how to use Excel.
If you already know Excel, then this article is not for you.
The goal is to offer you an Excel guide for beginners to introduce you to the spreadsheet and show you what you can do.
Welcome to Excel
For beginners, Excel might be a little scary. It’s normal!
What is Excel for?
Microsoft Excel is a helpful and powerful application for data analysis and documentation. It is a spreadsheet program, which includes a number of columns and rows, where each intersection of a column and a row is a “cell.” Moreover, each cell contains one point of data or one piece of information.
So, you can make information more comfortable to find by organizing the information in this way, and you can automatically draw information from changing data.
Using formulas and functions, you can make sense of your data by turning it into useful information. For example, you can automatically view sums, averages, and totals.
Excel-workbooks VS worksheets
Workbooks: Excel documents are called workbooks, and many (not all) versions of Excel will automatically have three tabs, each with its own blank worksheet when you first create an Excel document (a workbook).
If that’s not what your version of Excel does, don’t worry, we’ll learn how to build them.
Worksheets: The worksheets are the actual components where the data is entered. Think of the worksheets as those tabs if it is easy to think of it visually.
By right-clicking and choosing the delete option, you can add tabs or remove tabs. Those worksheets are the real spreadsheets we are dealing with and finally, we are stored in the workbook file.
What will you learn in this article?
It’s a short path for beginners where you’ll learn how to use Excel, such as- what a spreadsheet is, how to enter data and save, print, share your Workbook.
To get started with Excel, that is all you need to remember.
What about the rest? Look for a solution in this blog: you will find many interesting articles that will allow you to learn many features.
Excel is a powerful application, even if sometimes it might be a little bothering. Nothing serious, we assure you!
That’s why we thought of this quick guide for those who want to start using Excel.
The secret to knowing Excel is:
- Have a lot of willpower and desire to learn,
- Do a lot of practice and,
- Have a good teacher!
How to open Excel
On my computer, I have installed the version of Excel 2019 for Windows. If you have a different version, no problem! The steps are identical.
When you first open Excel, the application will ask you what you want to do. It will show you a similar window.
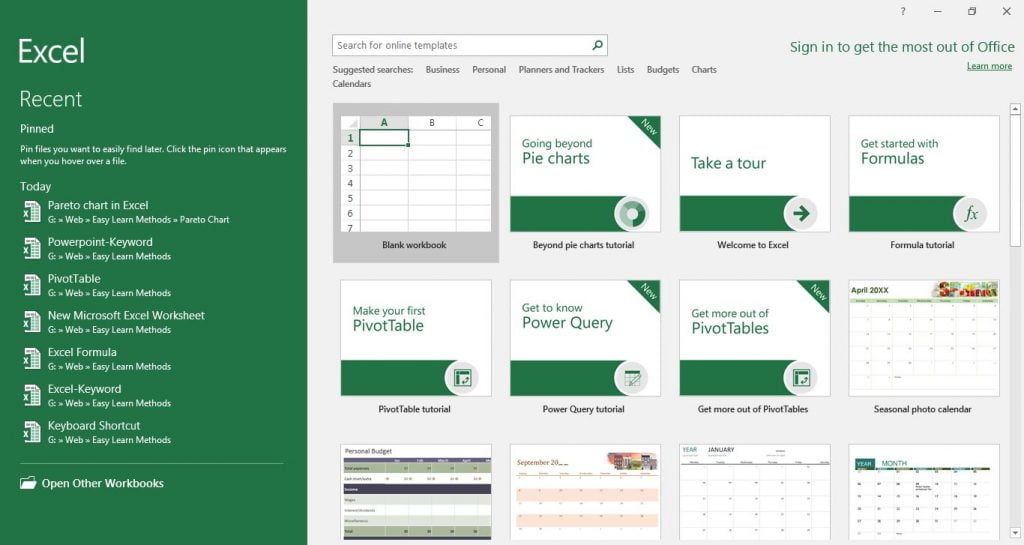
To open a new workbook, click Blank Workbook.
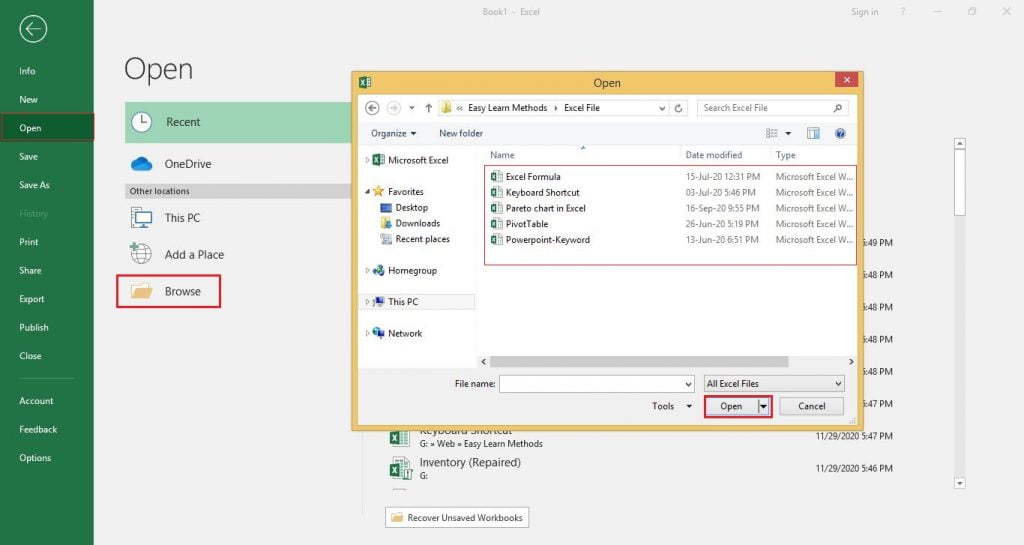
If you want to open an existing workbook instead, click Open. Then select the file in the list or click Browse.
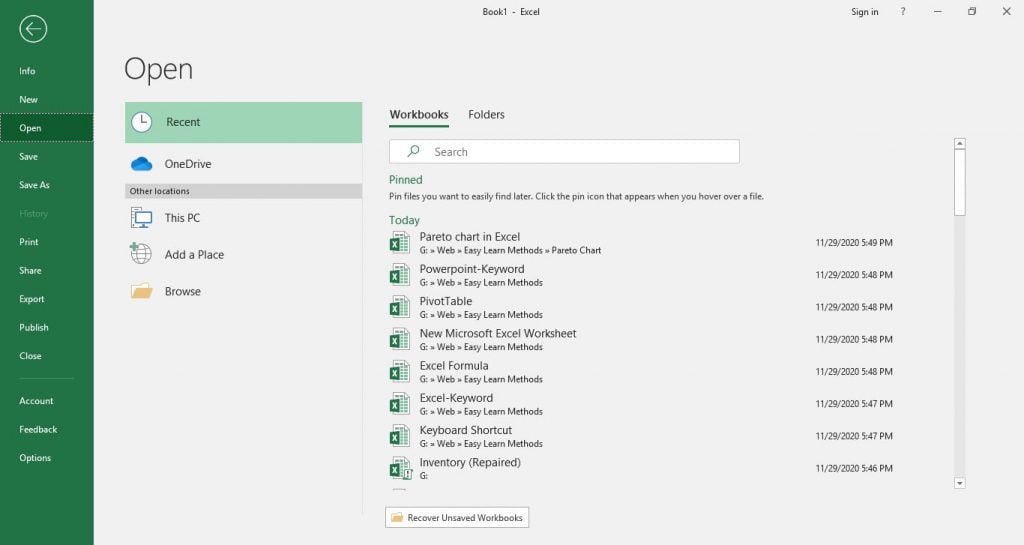
At this point, through the dialog box, find the Workbook you are looking for, select it, and click Open or double click on the selected Workbook.
You just heard of Workbook.
In Excel, the Workbook is a file. It usually has an extension of type . XLSX, but it could be . XLS if you are using a version older than Excel 2007.
I anticipate that you will also hear about Worksheets.
A worksheet is a single sheet within a workbook. A workbook can contain many sheets. So each Excel sheet is identified by a label and name that you will find at the bottom of the screen.
How to use excel for beginners: the ribbon

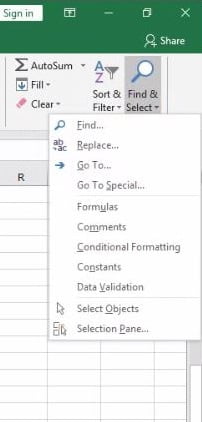
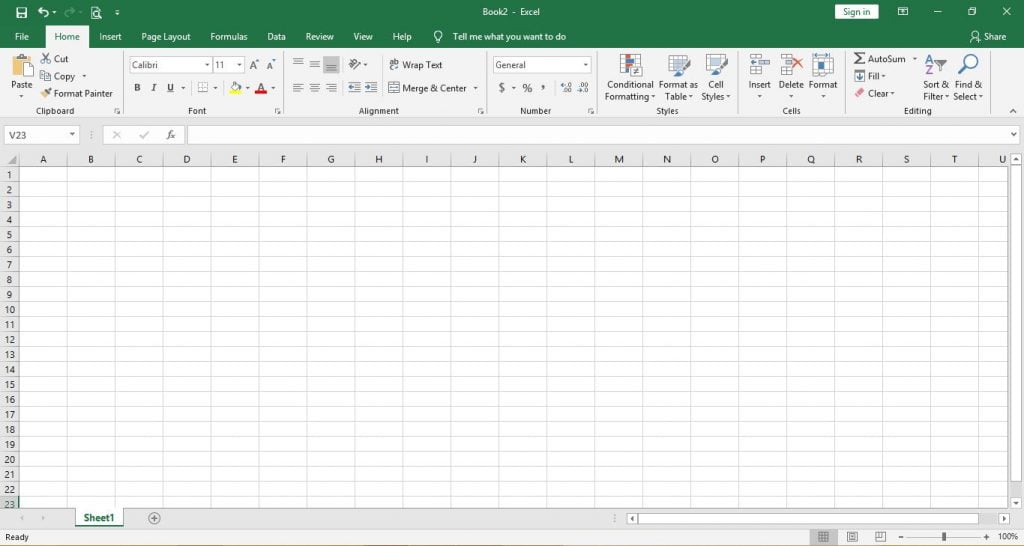
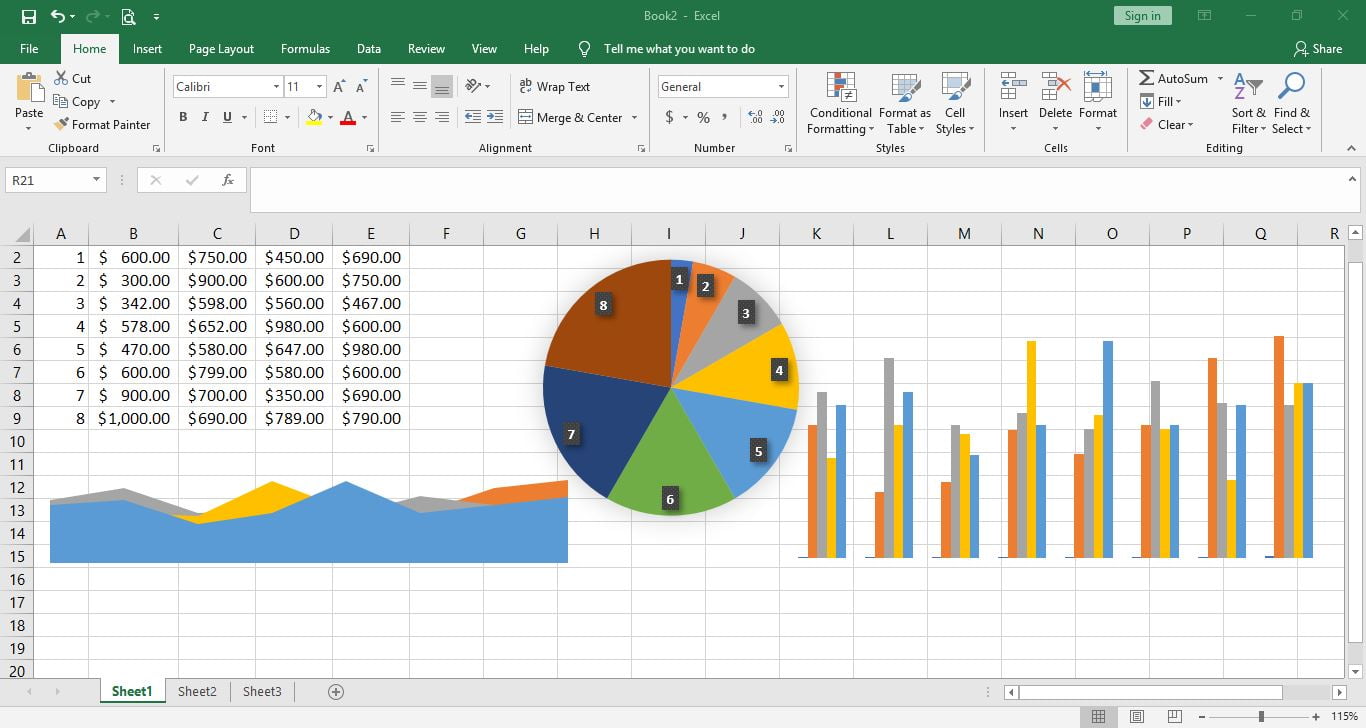
The ribbon is the control panel of Excel. Inside you will find many Cards, Groups, and Commands. You can do pretty much anything you want right from the ribbon.
Find the ribbon at the top of the window.
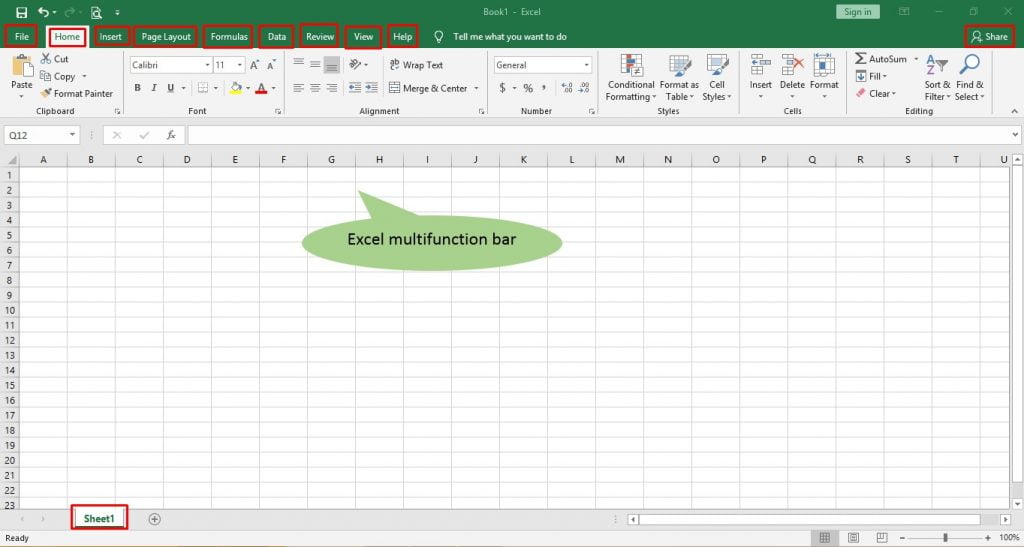
There are several tabs, including Home, Insert, Page Layout, Formulas, etc.
Each tab contains groups of commands. For example, you will find the Clipboard, Font, Alignment, Numbers, Styles, Cells, Editing group, all with different buttons on the Home tab.
Try clicking on the tabs to see what groups and buttons are contained within them.
Finally, you will find a search bar that says, “What do you want to do?”. Please enter in it what you are searching for, and Excel will help you find it. This is especially useful when looking for something specific – you can’t go through all the buttons to find out what they do.
How to use excel for beginners: Worksheets
As mentioned above, a workbook can contain multiple sheets. By default, Excel contains only one worksheet, but you can insert more.
Click on a label to open that particular worksheet.

To add a new worksheet, click the button at the end of the sheet list. The button with the “+” symbol.
Also, you can reorder the sheets in your Workbook by simply dragging them to a new location.
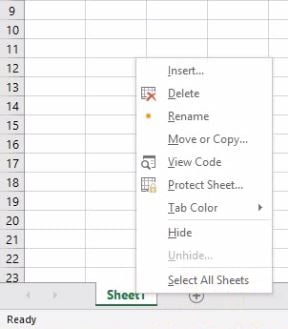
And if you right-click on a sheet label, you’ll get a context menu with a number of options. Among these, Rename and Delete are the most useful. For now, you can leave out the rest.
How to insert data into Excel
It’s time to enter some data!
Data entry is one of the most essential and simple things you can do in Excel.
So just click in an empty cell and start typing.
Type the following numbers into the cells.
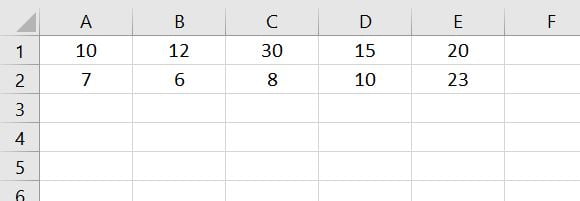
Excel cells can contain- text, numbers, and formulas.
Try typing some text or date in any cell and see what happens.
There are many other ways to enter data within a worksheet. For the moment, we will limit ourselves to this. However, we will use the numbers just entered to try to do the math.
Apply cell borders
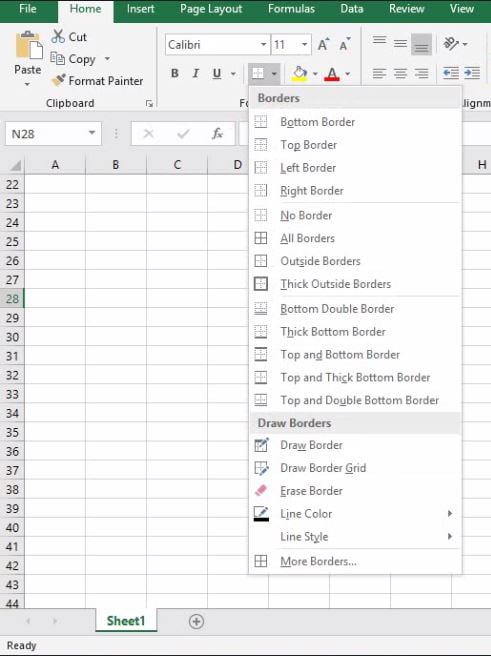
- Select the cell or range of cells to which you want a border to be added.
- On the Home tab, click the arrow next to Borders in the Font group, and then click the border style you like.
Apply Fill and Font Color
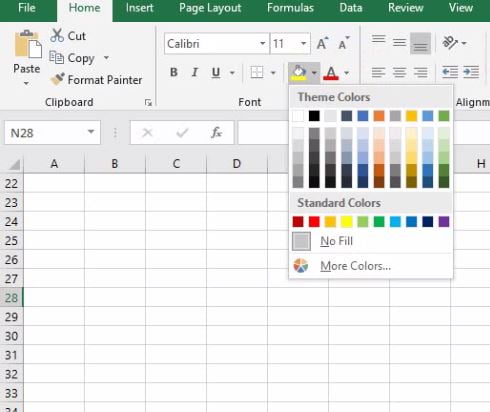
- Select the cell or range of cells to which you want cell coloring to be applied.
- Click the arrow next to the Fill Color Button symbol on the Home tab in the Font group, and then, under Theme Colors or Standard Colors, select the color you want.
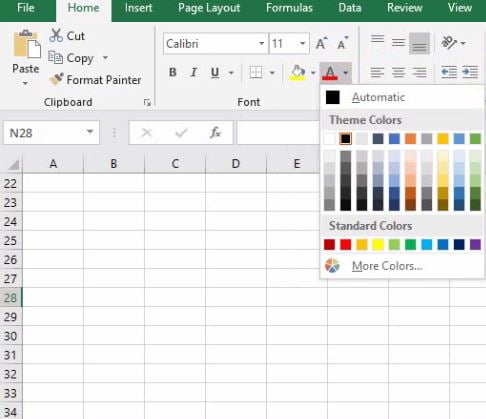
- To change the font color, click the Font Color button symbol on the Home tab in the Font group, then select the color you want under Theme Colors or Standard Colors.
How to include the data in a table
Putting the data into a table is an easy way to access the power of Excel.
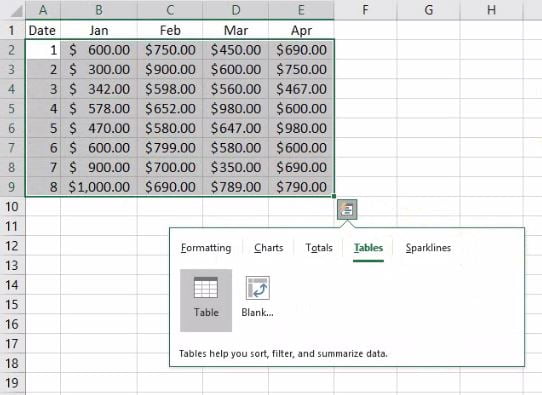
- To select the data, click the first cell and dragging it to the last cell in your data. To use the keyboard to select your data, click the first cell, hold down the Shift key, and press the last cell’s arrow keys.
- After selecting your data, a Quick Analysis button
 appears in the bottom-right corner and clicks on it.
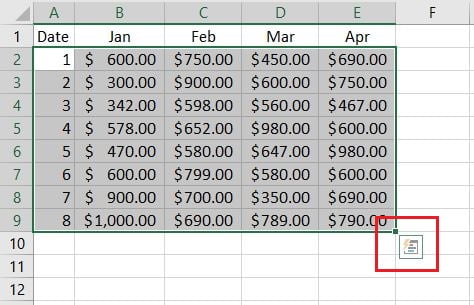
- Move your cursor to the Table button in the Quick Analysis Table gallery, and then click the Table button.
How to use excel for beginners: Sort
To quickly sort your Data
- Choose a date range, such as A1:E9 (Multiple columns and rows) or B Cell (single column). Titles you have created to define columns or rows can be included in the range.
- Select a single cell in the column that you want to sort.
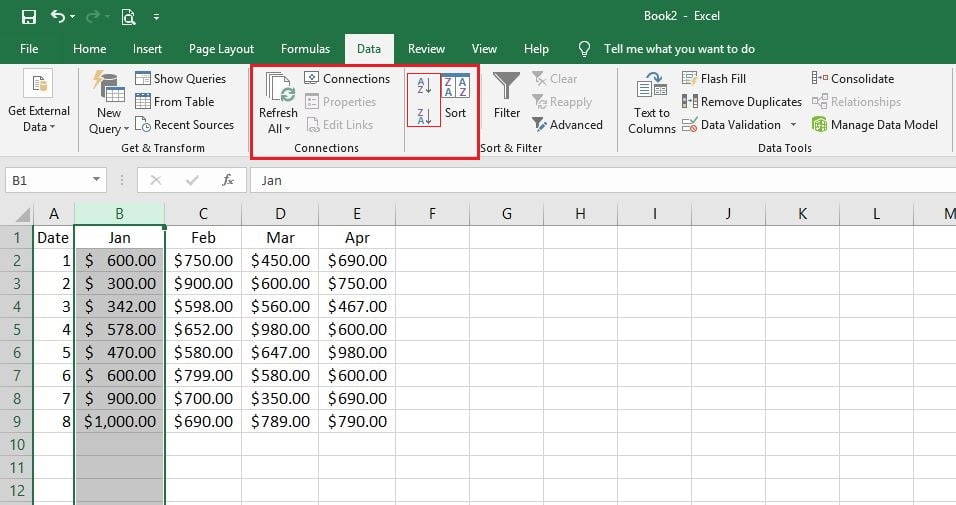
- In Excel, click the A to Z
 command to sort A to Z or the smallest number to the largest (A to Z or the smallest number to the largest) to perform an ascending sort.
- In Excel, click the Z to A
 command to sort Z to A or the largest number to the smallest number (Z to A or the largest number to the smallest) to perform a descending sort.
To sort by the specific situation
- Firstly, select a single cell from anywhere in the range to be sorted.
- Choose Sort on the Data tab, in the Sort & Filter group.
- The Sort dialog box becomes visible.
- In the Sort By list, select the first column you want to sort from.
- Select any Values, Cell Color, Font Color, or Cell Icon from the Sort On the list.
- In the Order list, pick the alphabetically or numerically ascending or descending (— for example, A to Z or Z to A for text or lower to higher or higher to lower for numbers) order that you want to add to the sort operation.
How to filter your Excel data
- Select the data to be filtered.
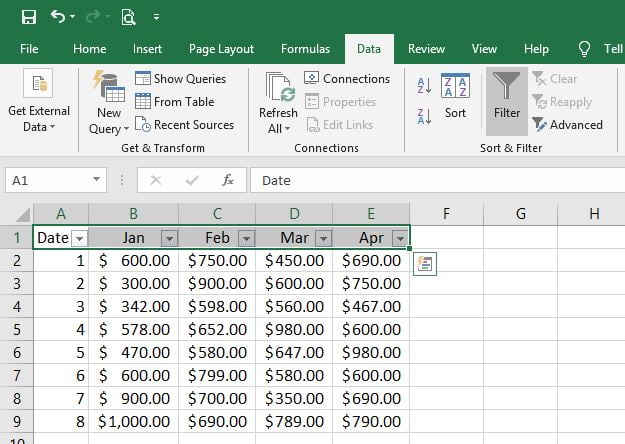
- In the Data tab, click Filter in the Sort & Filter group.
- On the Data tab, group Sort, and Filter.
- Click the Arrow Filter drop-down arrow in the column header to show a list of filtering choices that you can make.
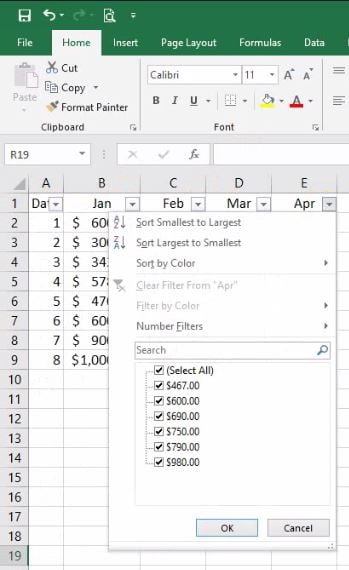
- To select by value, clear the check box (Select All) in the list. This removes from all checkboxes the checkmarks. Then pick only the values you want to see, and then click OK to see the results.
How to use excel for beginners: do the basic calculations
Now that we have seen how to insert some data into a worksheet, let’s see how to do some simple processing.
Performing basic calculations in Excel is simple.
The important thing that you must ALWAYS keep in mind when working with formulas is that: all formulas always start with an equal sign.
Whenever you perform a calculation, the first thing you need to type is the equal sign “=”.
This is the way to alert Excel to prepare to perform a calculation.
Now let’s try to do a sum in Excel. Type the following formula in cell A3.
=10+7
Then, hit the Enter key.
Excel evaluates your formula and displays the result: 17.
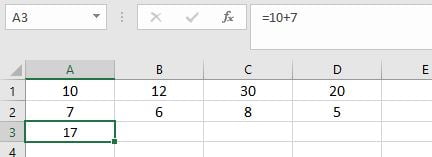
Now, look at the formula bar. You will see the original formula.
This is useful in case you forget what you originally typed.
You can modify the contents of a cell in the formula bar as well.
Click in any cell, then go to the formula bar and start typing.
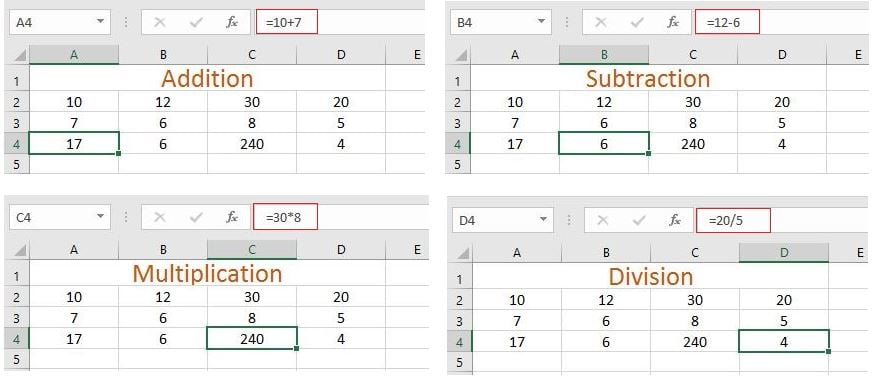
Perform subtraction, multiplication, and division are just as easy.

Enter the following formulas in cells B3, C3, and D3, respectively.

The result will be the following.

Now let’s change perspective and try something different. What I’m going to show you is one of the fundamentals of Excel.
Type the same data into another worksheet. Now click in cell A3 and type the following:
=A1+A2
Finally, hit the Enter key.
You should get 17: the sum of the numbers in cells A1 and A2.
At this point, change one of the numbers to A1 or A2.
What happens when you change the values in one of the cells? You will notice that Excel automatically updates the total.
Try applying the different arithmetic operations in the other cells. The result will be identical, but the perspective is distorted.
Subsequently, it will be sufficient to change the cells’ contents to which the formula refers to obtain different results.
What you did manually earlier can be done automatically.
Use AutoSum to add your Data
When you’ve entered numbers in your sheet, you may want to add them up. A quick way to do that is by using AutoSum.
- Select the cell below or to the right of the numbers that you want to add.
- Click the Home tab, and then in the Editing group, click AutoSum.
- On the Home tab, AutoSum.
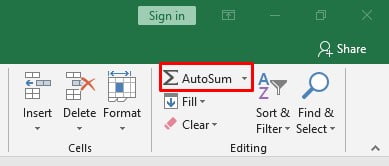
- AutoSum adds up the numbers and finally displays the result in the selected cell.
The heart of Excel: the functions
The engine of Excel functions. Thanks to the functions, you can perform complex calculations.
Basically, you will find the standard Excel functions in the Edit group of the Home tab.
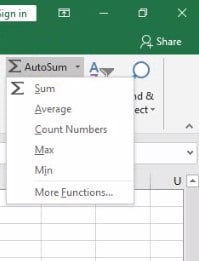
Now let’s see how to use one of the many Excel functions.
Let’s go back to the sheet containing the data entered previously.
Let’s go to cell E1 and then click on the Excel Sum function.

Then, hit the Enter key.

The resulting number, 72, is the sum of the numbers in cells A1, B1, C1, and D1.
As you can see, in the SUM function, I entered the word “A1: D1”.
This writing tells Excel to refer to all cells A1 to D1.
There are many useful functions in Excel. Some you can use alone, others instead as nested functions. Nested functions are functions within functions.
If you want to see all the functions that are available, then go to the Formulas tab, and you will find all the function libraries.

Then, click on one of the icons to find the function that will allow you to solve a specific problem.
Scroll through the list of functions that are available and pick the one you want.
When you start typing a formula (don’t forget to enter the equal sign ), Excel will help by showing you some of the possible functions you might be looking for.

Finally, after typing a formula name and the opening parenthesis, Excel will tell you which arguments you need to enter.

It might not be easy-to-understand Excel’s advice if you’ve never used a function before. It will become clearer, however, with a little practice and experience.
How to use excel for beginners: Save your work
In order not to lose the work you’ve done within your Workbook, you’ll need to save your changes.
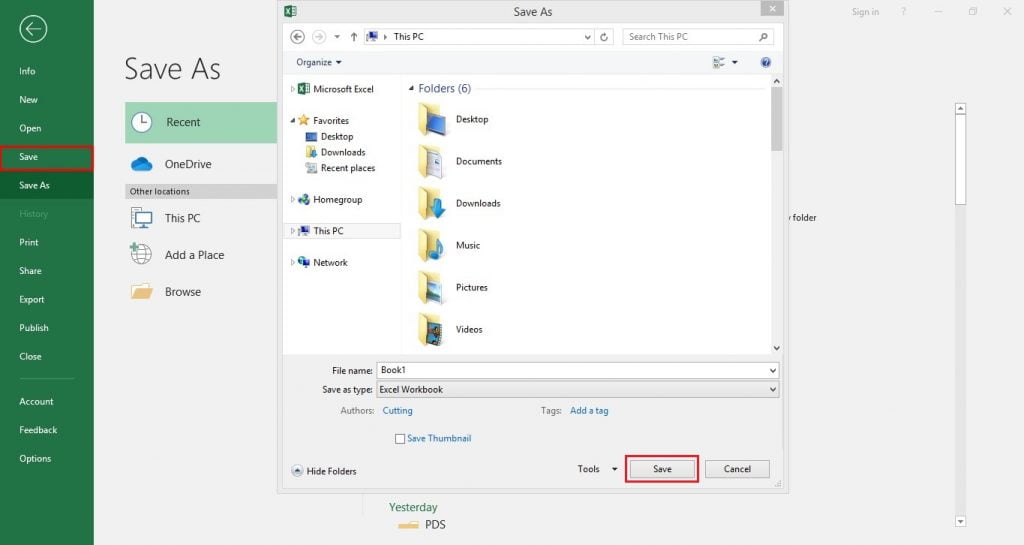
Use the F12 function key to save. If you haven’t saved your file yet, Excel will ask you where you want to save it and what name you want to assign.
On the other hand, you can click the button Save this in the Quick Access toolbar.

I suggest you save often.
Get into the habit of naming and choosing a location to save your file before you start working.
Otherwise, losing your job could be painful!
How to use excel for beginners: Print worksheet
- Click the File tab, and then the Print button, or keyboard shortcut press Ctrl+P.
- By clicking the Next Page and Previous Page arrows, preview the pages.
- In the Print Preview window, the Next and Previous buttons.
- Basically, depending on the settings of your printer, the preview window shows the pages in black and white or in color.
- You can change page margins or add page breaks when you don’t like how your pages are written.
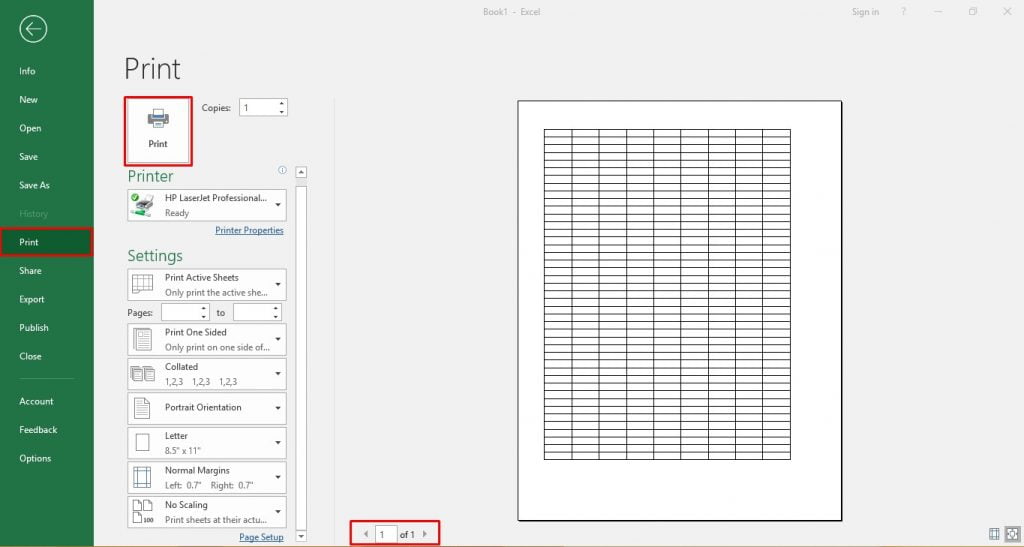
- Finally, click Print.
How to use excel for beginners: Share workbook
The easiest way to share your Excel files is to use OneDrive.
Simply click the Share button in the top right corner of the window.
Excel will guide you through sharing the document.
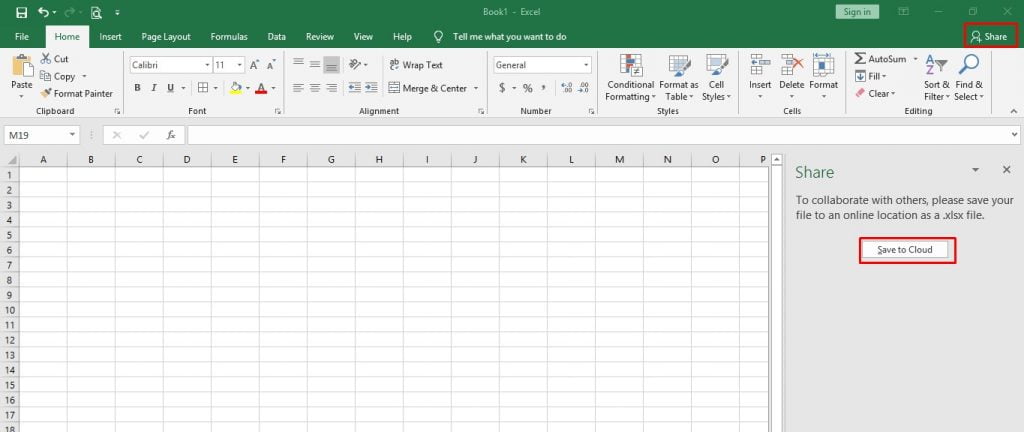
Also, you can save your document and send it by email.
On the other hand, you can use any other cloud service (Such as- IDrve, SugarSync, Dropbox, etc.) to share it with whoever you want.
Activate and use an add-ins
- Choose Options on the File tab and then choose the Add-Ins category.
- Near the bottom of the Excel Options dialog box, in the Manage box, make sure that Excel Add-ins are selected, then click Go.
- In the Add-Ins dialog box, select the add-ins you want to use in the check boxes, and then click OK.
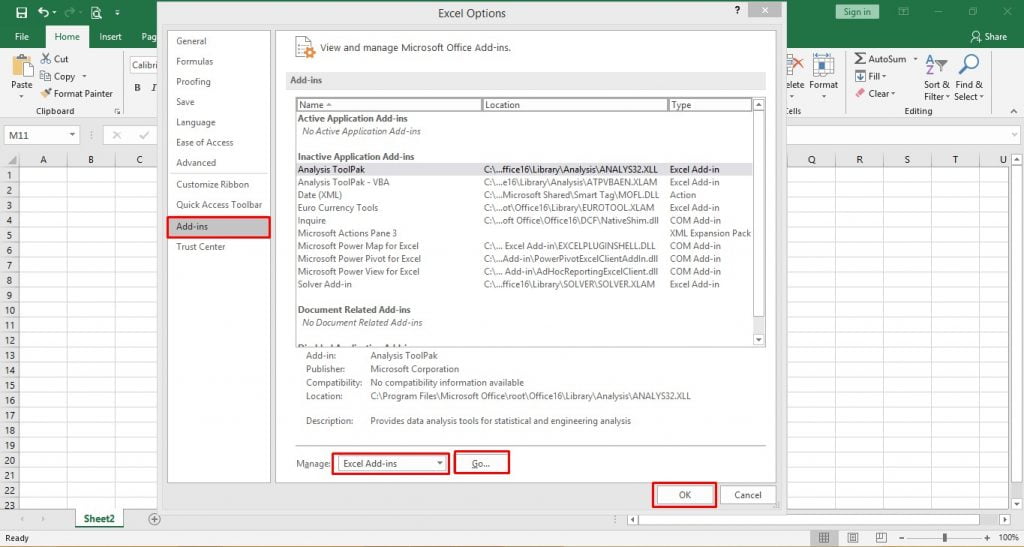
If Excel shows a message stating that this add-in cannot be run and prompts you to install it, finally click Yes to install add-ins.
How to center text across cells without using the Merge and Center option in Excel?
It’s not difficult to do this, go to your Excel sheet and select the cells that you want to center.
After selection, right-click on it and select Format Cells or use the keyboard shortcut Ctrl+1 then you will see the Format Cells dialog box.
Go to Alignment in the dialog box.
Choose Center Across Selection from Horizontal group.
And finally, click OK.


[…] Microsoft Excel has several line graph models, namely: line, stacked line, 100% stacked line, line with markers, stacked line with markers, and 100% stacked line with markers which has a marker and one without a marker in 2-D form, as well as a 3-D model line diagram. 3D Line is like the basic line graph but is represented in a 3D format. […]
[…] working with Excel, we can use many key combinations to speed up specific steps when we want to bring out a particular […]
[…] is very common to confuse formulas and functions in Excel when we use Microsoft Excel. To perform mathematical operations, both tools are used, and for this reason, it is easier to […]
[…] When creating reports and tabulation materials using Excel, we may need to display comments and supplementary messages in some cells to make it easier for users to input and prevention of description errors. In this lesson, we are going to learn how to add a pop-up message in Excel. […]